
Mold can be a resilient and unwelcome guest in many homes, and one of the crucial steps in mold removal is correctly identifying the common sources from which it often arises. By understanding these origins, homeowners can be more proactive in addressing and preventing mold growth, ultimately making their living environments healthier and safer.
Mold thrives in environments that are damp, warm, and poorly ventilated. Common sources in the home include areas with high humidity levels, such as bathrooms, kitchens, and basements. Leaky roofs and walls are also notorious for providing the moisture mold needs to establish itself. Identifying these areas as potential problem zones allows for a more focused mold remedy approach.
To aid in identifying these common sources, consider the following list:
- Bathrooms: Frequently damp and humid, bathrooms are a prime location for mold growth, particularly around shower stalls, bathtubs, and sink areas.
- Kitchens: Areas under sinks and around refrigerators are prone to leaks and moisture build-up, making them common mold hotspots.
- Basements: Due to their proximity to the ground and often inadequate ventilation, basements can harbor undetected mold for extended periods.
- Roofs and Attics: Leaky roofs often lead to water seeping into the attic, providing a prime breeding ground for mold.
- Windowsills: Condensation commonly accumulates on windowsills, particularly in older or inadequately sealed windows, creating a moist environment for mold to grow.
In addition to knowing where to check, understanding the conditions that facilitate mold growth is equally important. A comparative look at factors influencing mold presence can guide homeowners in recognizing areas needing attention.
| Factor | Impact on Mold Growth |
| Humidity Level | High humidity levels (>60%) can expedite mold growth significantly. |
| Temperature | Mold tends to flourish in temperatures between 70°F and 90°F. |
| Ventilation | Poor ventilation can trap moisture and elevate the risk of mold. |
| Moisture Intrusion | Leaks and water damage create direct sources of moisture, which support mold colonization. |
By addressing these factors, such as fixing leaks, improving home insulation, and utilizing dehumidifiers, one can reduce the risk of mold infiltrating their home. Recognizing these mold sources early and taking preventive measures effectively tackles small mold spots before they evolve into larger, more challenging infestations.
gathering essential cleaning supplies
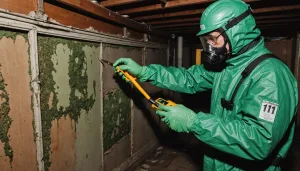
Before embarking on any mold removal process, it’s essential to have the right tools and supplies on hand to complete the task safely and effectively. Having a well-stocked kit ensures that mold remediation is both comprehensive and efficient, minimizing the risk of mold returning or spreading to other areas.
To gather the necessary cleaning supplies, follow these steps:
- Collect Appropriate Cleaning Solutions:
- Use a mold-specific cleaner available in most hardware stores, designed to target and eliminate mold spores effectively.
- Alternatively, prepare a homemade solution by mixing one cup of bleach with one gallon of water. While bleach is effective against non-porous materials, remember it might not fully penetrate porous surfaces.
- For a more natural remedy, consider using white vinegar or a baking soda solution. While less harsh, these can be effective against smaller mold spots.
- Protective Gear:
- Wear disposable gloves to prevent skin contact with mold and cleaning agents, which could lead to irritation.
- Use a protective mask or respirator rated for mold spores (N95 or higher) to avoid inhalation, which can pose health risks.
- Safety goggles are essential to protect your eyes from mold spores and cleaning sprays.
- Cleaning Tools:
- Select a variety of scrub brushes—different sizes for accessing tight corners and larger areas are beneficial.
- Ensure you have a set of sponges or cleaning cloths that can be disposed of after use to prevent mold spreading.
- Miscellaneous Supplies:
- Gather a roll of paper towels for initial blotting and disposable wiping, offering quick discard to prevent spore spread.
- Keep a spray bottle handy for applying your cleaning solution to affected areas evenly and effectively.
- Consider having a garbage bag on hand for disposing of any contaminated materials immediately after cleaning.
Ensuring you have every item on this checklist will streamline the cleaning process and support effective mold remediation. Starting with appropriate supplies allows you to tackle the mold with confidence and preparedness, emphasizing safety while making sure the mold is eradicated effectively and doesn’t retreat into the home’s environment.
preparing the affected area
Once you have gathered all the necessary cleaning supplies, the next step involves getting the affected area ready for mold removal. Proper preparation not only enhances the efficiency of your mold remedy but also ensures that the cleaning process is conducted safely and effectively. Here’s how to prepare the area:
Begin by clearing the vicinity of any personal items or furniture. This not only grants you unhindered access to the mold spot but also prevents possible cross-contamination. Items that are porous and heavily affected by mold, like curtains or upholstery, might need to be discarded, as mold can penetrate deeply into these materials and become challenging to eliminate.
Next, make sure the area is well-ventilated. Open windows and doors to allow fresh air to circulate, which helps in dispersing mold spores released during cleaning. Proper ventilation minimizes your exposure to mold spores and fumes from cleaning agents, contributing to a safer cleaning environment.
Seal off the area to contain any liberated mold spores and prevent them from spreading to other parts of the house. Use plastic sheeting and duct tape to cover doorways and vents. This serves as a containment barrier, a crucial step particularly if you’re dealing with mold in a frequently used room, such as a bedroom or living room.
Before commencing the cleaning process, inspect for any obvious sources of water intrusion, such as leaks or condensation, responsible for the mold growth. Addressing these issues is crucial, as it prevents the mold from returning once the removal process is completed. This may include repairing leaky pipes or improving insulation to curb condensation issues.
In spaces that are tricky to reach or have multiple mold spots, consider setting up a dehumidifier. Reducing the moisture content in the air makes the environment less hospitable to mold, aiding the mold remedy by not only assisting in the current situation but preventing mold recurrence.
Finally, ensure your protective gear is fitted properly. Double-check that your mask fits snugly to prevent inhaling any airborne spores, and ensure your gloves and goggles are secure to avoid contact with cleaning agents or mold.
By meticulously preparing the affected area, you bolster the effectiveness of your mold removal efforts while prioritizing safety. These preparation steps are a critical precursor to effective cleaning techniques, setting the stage for a thorough and successful mold remedy.
effective cleaning techniques
To remove small mold spots effectively, it’s crucial to apply cleaning techniques that ensure a thorough cleanup while minimizing health risks. Before starting, revisit the checklist of your gathered cleaning supplies and ensure all necessary items, especially protective gear, are at your reach.
Start by applying your chosen cleaning solution generously to the mold-affected area. Using a spray bottle can help distribute the solution evenly, ensuring complete coverage. For homemade solutions like a bleach mix or white vinegar, allow it to sit for about 10-15 minutes to penetrate and kill the mold spores effectively. This dwell time is critical in breaking down the mold structure for more effortless removal.
Once the solution has settled, use a scrub brush to gently but firmly scrub the mold off the surface. Opt for brushes that can reach into tight spaces or corners where mold might hide. Employ circular motions which help lift the mold away from the surface, avoiding spreading it further. For porous surfaces, be cautious as scrubbing might cause spores to dig deeper into the material.
After scrubbing, wipe away the loosened mold using disposable cloths or sponges. Immediately dispose of these materials in a sealed plastic bag to prevent any spores from escaping and contaminating other areas. It’s imperative to change your wipes or cloths frequently, as continuing with a contaminated one can reintroduce mold to cleaned surfaces.
Rinse the cleaned area with a clean, damp cloth to remove any residual cleaning solution or mold remnants. Ensuring no residue is left is key to preventing any discoloration or damage to the surface. Allow the area to dry thoroughly by leaving windows open or using fans to enhance airflow.
Remember, mold spores can remain airborne even after the visible mold is removed, so maintain protective gear throughout the cleaning process. Use a HEPA vacuum to clean the area surrounding the mold spot to capture any loose spores. A regular vacuum won’t suffice, as it might not filter out the tiny spores effectively.
Throughout this mold remediation process, be vigilant about maintaining a dry environment, as any lingering moisture can reignite mold growth. Following these techniques with precision not only facilitates a successful mold removal but also prepares the space to resist future mold infestations.
By adhering to these effective cleaning protocols, you ensure the mold is thoroughly eradicated, contributing to a healthier home environment and setting the foundation for long-term mold management.
preventing future mold growth
To minimize the recurrence of mold and avoid extensive mold removal processes, it’s crucial to implement preventive measures that address the root causes of mold growth. Start with controlling humidity levels in your home by using dehumidifiers in areas prone to moisture, such as basements and bathrooms. Aim to maintain indoor humidity levels below 60%, as high humidity fosters mold growth.
Ensure adequate ventilation throughout your home. Regularly open windows and use exhaust fans in moisture-heavy areas like the bathroom and kitchen. Proper ventilation allows moisture to dissipate, making the environment less favorable for mold. In colder months, consider using energy-efficient windows and doors to prevent condensation, which can lead to mold growth around windowsills and other similar areas.
Regular maintenance checks can greatly aid in preventing mold. Inspect your home frequently for signs of leaks, especially in areas like roofs, basements, and around plumbing fixtures. Promptly repair any leaks or water damage to mitigate mold-friendly conditions. Keeping gutters clean and functional can also direct rainwater away from your home’s foundation, reducing potential moisture buildup.
Apply mold-resistant products in areas particularly susceptible to mold. This includes using mold-resistant drywall or paint in bathrooms and kitchens. These products contain antimicrobial agents that inhibit mold colonization and promote easier cleanup if mold does appear.
Lastly, consider conducting a comprehensive review of your home’s ventilation and insulation systems. Correcting ventilation issues, optimizing airflow, and ensuring proper insulation can significantly reduce condensation, a common cause of moisture-related issues in households.
Incorporating these preventive strategies helps maintain a mold-free home environment, reducing the need for frequent mold remedy interventions and contributing to a healthier living space for you and your family.
In conclusion, by identifying common mold sources, gathering the right cleaning supplies, preparing affected areas, employing effective cleaning techniques, and implementing preventive measures, you can tackle small mold spots safely and prevent future outbreaks. A proactive approach ensures a healthier home environment and minimizes extensive mold removal efforts in the future.